Posts

Showing posts from March, 2018

project evaluation

Project Evaluation Over the process of doing this project, I have experimented using different techniques to create work inspired by other photographer that solves a problem based in time. I think the things that went well with this project are the time lapses' which were created using photoshop and show ice melting over the period of time. I also think I improved on using this technique and took it further to use it as a final outcome. I think another experiment that went well was the Harold Edgerton experiment, this was something I enjoyed doing and I would have like to take some more time to experiment further with. However, it was a lengthy process in setting up and achieving good results from this. It is a trial and error and luck to capture a good outcome from this. I think I could have experimented more using the stop motion narrative process, by taking more photos to extend the story as I feel it is quite short. I learn from my final outcome of the ice melting how diffi

Final outcome

Image
This is my final outcome, I decided to recreate and improve my time-lapse with ice. I think this one worked a lot better then my first one. I perfer this one as I feel the timing is a lot better then the one I did before.  I used squash to colour the water to make it stand out more compared to using water.  I took a photo every minute for an hour using the shutter speed 1/400, a aperture of f5.6 and an ISO of 6400. This time I didn't use a light, I used the natural light to try and reduce the flickering light. However, the lighting does change through out this time-lapse, but it is less dramatic then my first one.  I set the camera up on a tripod and used a remote to prevent the camera shake.  I think it could be better if there was less reflection change on the side of the bowl and on the side of the frame. I do think this is a better timeline then my first as the ice it a lot smoother with the change as the ice melts. From this I learnt how difficult it is to keep the

Stop motion experiment

This is my narrative experiment, I took a series of photos using the pens. With each photo I change the position of a pen. I took around 135 photos to create this, I first had to take the photos into photoshop and increased the saturation to make the background less blue looking and then I converted the raw files into jpegs so I could then put the photos into premiere pro to create this sequence. I think this works well and the video appears smooth flowing. To improve this I think I could have taken more photos to lengthen the video. I like the overall look and appearance of how my narrative experiment turn out, I tried different ways of moving the pens in different positions and using all the objects I had. I even tried to experiment with spelling out a word letter by letter such as, colour. Which, in my eyes didn't turn out as well as I had hoped due to their straightness. I think maybe I should have extended the sequence by putting the pens into colour order I think this

Harold Edgerton experiment

Image
We, as a group experimented using a plum and dropping it into a tank of water. We set up the triggers and infra red beams to set off when the plum dropped in front of them. We had to use small groups , a person taking the photo and telling the other to person to drop the plum into the water. We also used someone to reset the trigger for the next picture. We swapped around within the class group so that we all got the chance of doing the different roles. Someone was also needed to refill the water tank ready for the next photo. The room had to be in complete darkness as we were using the flash so we also had someone controlling the light, by turning them on and off so that we could set up for the next photo. My part in this was first to take some photos and tell Yasper when to drop the plum, We then swapped and I set up the infra red beam to trigger the flash to capture the photo. Below is some pictures of how we set up the studio to take the Harold Edgerton style images. The set up to

Ice gif experiment

Image
Ice gif Experiment I set up the camera to take an image every 30 seconds for an hour. I used squash to colour the ice to make them stand out better in the photo. I then put the photos into photoshop and decided the time between the photos was too long so I removed some of the frames. I then put the photos on a loop so it never stopped. I feel this is a good experiment using the ice. I think I could slow down the frames or make the giff go backwards so that the ice melts and then refreezes. I think I could set up a spot light above the bowl to create consistent lighting, or I could have done this during the day to use consistent lighting and prevent the gift from looking like it flashes. I also think if I took the photos in jpeg I would be able to use a lot more photos and show a smoother process to the ice melting. This experiment was inspired by the work of Sam Taylor Johnston as she captures the lengthy processes such as, a bowl of fruit decaying over a long period of time. This

Koyaanisqatsi

Image
Koyaanisqatsi A 1999 American film which involves slow motion and time lapse photography through a cityscape. There are many scenes in the film where they are slowed down and sped up. This is used to create dramatic effect. It is a documentary film where there is no conventional plot, it focus is changed from subject to subject, with no specific link between them.

Justin Quinnell research

Image
Justin Quinnell Quinnell was first introduced to the idea of pinhole when he was four he had to have an operation on his eye. He had to have a bandage over it with a small hole in it as vision. He has also experimented using lots of different objects to create a pinhole for example a wheelie bin, a shoe box and a tin can. He creates his own pinhole cameras using a tin can. He puts them up facing south for a long time to capture the suns movement across the sky for around 3- 6 months. I have created my own pin hole camera using a 500ml can and put photographic paper in it. I also have put it facing south and I will leave it there for around 3 months to create a similar piece to Quinnell's work.  This is one of his work which shows what looks like a grave yard for around 3-6 months. It appears to show how the suns position change in the sky over this time. The gaps between where the lines meet shows days or periods of where the sun it not there, like a cloud or a rainy day. This pin

movement dance experiment

Image
 This is the contact sheet of the image I took using movement and the dance studio students.  Here is a sequence I put together using my movement photos. They are inspired by Eadweard Muybridge's sequences of the horse galloping. With these photos I experimented with different shutter speeds such as, 1/40 to blur the motion an example of this is the second photo. I also experimented with fast shutter speeds to freeze the motion such as, 1/125 an example of this is the first photo. I thought these photos worked well together and I experimented to create work that resembles the work of Eadweard Muybridge. I think if I was going to experiment more with this technique I would use more images and maybe capture them continuously so that they work better together like Eadweard Muybridge's horse galloping. I enjoyed this technique as it captured the dance  students practising, they didn't notice or were they bothered that we were there.I learnt that it was also very easy as the

after effect

Image
I think this is my better after effect final image, I experimented using another image. However, the quality of the image was poor so it didn't work as well. I like the appearance of this image and I think it worked well.  I put the shard and the plane on different layers I imported the different layers into after effect I set the sky to move across the sky I then set the plane to move across in front of the sun I then imported the shard and made it move slowly. This is another experiment I did, where I learnt that the quality of the image is very important. The quality of this image wasn't very good, so the quality of this moving image isn't very good. I think if I was going to re-experiment with this technique I would make sure all of the images are raw files. However, I do like the idea of the car driving down the road and I think the scale of the car looks realistic to its size in real life when it gets smaller by perspective as it travels further away

stop motion research

Image
Stop motion appears to be a video made up of single photos, they appear to make an object move on there own. The photos are played as a fast motion video. Norman Mclaren- uses stop motion in "Neighbours", his anti-war video produced in 1952. He uses live actors instead of drawings and puppets. The process to create a stop motion is setting up an object, taking a photo then moving it slightly and taking another photo. An example of stop motion is lego men and moving its arm and legs very slowly and taking a photo with every movement. They then get put together to make a short clip. Wallace and Gromit was created using this process. 

Harold Edgerton and Eadweard Muybridge

Image
Eadweard Muybridge Research Edward Muybridge was born 9th April 1830 and died 8th May 1904 both in Kingston upon Thames. He was importantly known for his work in creating motion. He mainly focussed on humans and animals, creating sequences involving different positions from animals. Although, some looked very similar.  Time can be shown through many ways using photography such as photos that work well as a series. Eadweard Muybridge used this technique of motion to solve the problem of whether a horses legs leave the ground during a gallop. He proved this by setting up a series of cameras and wiring them up so the horses legs release the shutters to capture the images. Muybridge also captured series' of other animals in different positions. He went on to capture a series of photo of a lady showering, which in them days the nudity wasn't seen as a good thing, in his photography. This experiment to prove if a horses legs leave the ground where galloping earnt Muybridge a pri

timelapse sequence research

Image
Time -lapse photography is where a certain amount of frame still images are taken and then put together to make a moving video. These video present the course of time and how things can change within a certain time frame. Time-lapse's speed up time to show the change. Sequence photography is when you take a series of photos where the subject changes during each image to capture time. There are lots of different ways sequence photography can be presented such as, in the same photo or in separate images alongside each other.

timelapse gif traffic

Image
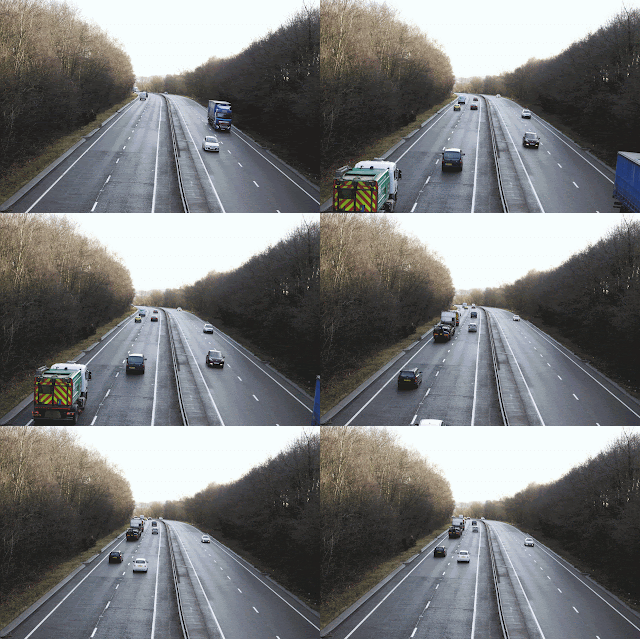
 I experimented making a gif of my own. Although this is only a shorter version of my gif . I used the same process as the gif tutorial before. I think it worked well showing movement through the traffic travelling. I think maybe it could have been a little smoother as it shows some movement through the camera. I think using a sturdy tripod would prevent this. I think to make this better I could re- experiment with this technique with traffic at night and use a longer shutter to capture the light trails as the traffic moves. I could also combine slow shutter speed photos with fast shutter speed photos to make a more interesting gif. From this I learnt that a tripod or timer is needed to remove the movement of the camera.I think this gif was successful. However, I would use a timer or tripod if I was to re- try this method.

pinhole lumen

Image
The instruction Brief we used to make our pinhole camera. The positioning for my camera (facing south) The view the camera should record of the path the sun takes over the three month. This is the outcome from my lumen experiment I took it down on the 21st of March which is around 3 months after putting it up. I think it was very successful the can didn't move during this time which means a clear representation of the suns movement of this time. The white lines are the light trails proved by the sun, it shows the sun got higher in the sky over the 3 month. The gaps which mainly begin towards the end of the time are cloud, You can see this on the last day, there was periods of sun and then cloud which stopped the trail. The original image was the opposite and I had to photograph the analogue image to make it digital so that I  could edit it in Lightroom and photoshop to invert the colours and increase the contrast of the image. In this image

Sam Taylor Johnston

Image
Solving a problem in time Sam Taylor Johnston A photographer who presents the idea of time is Sam Taylor Johnson. She is an OBE English photographer and filmmaker. Johnson was born 4th March 1967 in Croydon. At the age of 16 she started at an arts college in Hastings. She was originally a sculptor, who developed into photography and then video. In 2009 she directed a film based on John Lennon, which was one of her first main successful movies. She is also well known for her other films such as, "Fifty Shade of Grey" and short film "Love me more".  Johnston has featured in many magazines and even some books. She focussed on the still life side of time. She presented a time-lapse video of fruit as it decays over time. She made this by taking a series of regular photos, which shows how the grapes, pears and apple change over the time. I find this video quite disgusting in how mouldy the fruit get. To achieve this she would have had to take lots of photos over th

gif tutorial

Image
You first import the images through file> scripts > load files into stack Click Browse> select all the images and click OK Go to window > timeline change it to -Create frame animation choose make frames from layers make it loop forever This is my final Gif I made using the giff tutorial example images.

moodboard

Image